golf course image

Weight Shift in Golf Swing – Pivot Then Shift

The weight shift in the golf swing is a largely misunderstood concept. After all, how is one supposed to keep their head still, shift weight and stay behind the golf ball all during a swing that takes less than a second and a half to complete?

Fortunately, this online golf lesson article and the subsequent video golf lesson at the end will clear up all the mystery behind the proper weight shift in the golf swing.

It all starts with setup. Obviously the golfer is bowed forward with the chest somewhat over the ball, buttocks stuck out behind the heels counterbalancing the forward leaning chest. Weight is distributed evenly left and right and sits through the middle of the arches on the feet. In addition, the upper torso is leaning away from the target because the trailing hand and arm sit lower down the handle of the golf club. So to put it simply, bow forward and lean right if you are a right-handed golfer. Also notice your head will be behind the ball.

Golf Swing Weight Shift in Backswing
Backswing Pivot - Golf Swing Weight Shift
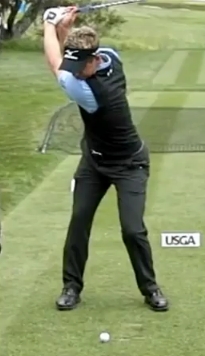
Luke Donald - Backswing Pivot Head & Chest Over Rt. Foot

Now it gets tricky. If you try to “shift” weight to the right in the backswing, you will likely slide your hips over to the right while trying to keep your head still. Your core will have moved out from under your head, and your upper body will be tilted the wrong way – back toward the target. The spine angle has literally reversed itself.

You see, the term “shift” is all wrong for the backswing. “Pivot” is a better term. The right hip will pivot back like sitting back in a chair and then around – actually coiling back toward the target slightly, not drifting sideways to the right. The right foot will stay braced on the instep, and the leg will remain leaning inward like a ball player braced to push off for a throw.

This pivot motion with the hips also involves coiling the trunk around the spine – this is not the same as turning around a still head. If you coil correctly around your spine, which was bowed forward and to the right at address, your chest and head will naturally flow to the right.

Remember your spine is located along the rear of your trunk so your chest, head and eyes are located out in front of the spine. Spine stays still and turns while sending head, chest and eyes to the right. This moves the weight of your chest and head over your right foot and creates the correct golf swing weight shift sensation in the backswing.

This lateral movement of the head is minimal, probably 1”- 3” for most golfers, nevertheless there is movement. Bottom line, do not attempt to keep your head perfectly still while sliding your weight to the right. You will get a reverse spine tilt in the backswing that sends your downswing over the top and casting, or you will overcorrect the spine tilt back to the right in the downswing so hard you throw the club in the ground.

Golf Swing Weight Shift in Downswing
Luke Donald Impact - Golf Swing Weight Shift
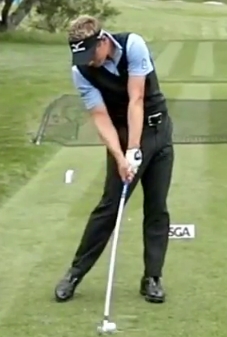
Luke Donald - Golf Swing Weight Shift to Impact Belt Buckle Past Ball

With the backswing pivot clarified, what do we do with weight shift on the downswing? It’s pretty simple actually. From the correct backswing position with the upper torso leaning away from target, all the player has to do is shift (yes, now it’s time to shift) the left knee and hip targetward as the downswing begins … actually both knees shift targetward.

This first move in the downswing is lateral, not circular or rotary, often cited as “clearing the hips.” Imagine leaving your back facing the target as your hips shift toward target. The hip clearing will gradually kick in a moment later as the arms lower to the waist-high area and the majority of weight has arrived on the front foot. At impact the golfer’s belt buckle will have shifted well left of the golf ball and will have begun turning left. The hands will also preferably be past the ball on all shots but the driver.

There you have it. Coil or pivot in the backswing, keeping the hips in a barrel as the old golf instruction cliché states. Be willing to allow the upper body to tilt to the right as the head likely drifts slightly to the right in backswing. Then blow out the left side of that barrel as the hips shift first, then clear on the downswing. The armswing will benefit by easily getting back well inside the ball in the backswing, then dropping in the slot on the downswing. No more over the top downswings or falling back off balance in the finish.

So what do you think? Are you willing to pivot the hips and let your head drift back in the backswing to develop a better weight shift and more repeatable downswing path with more power?

Watch the video golf lesson below, then try it out and leave your comments at the bottom of the page. Don’t forget to share this with your friends.

Herman


How to Stop Shanking the Golf Ball

To stop shanking the golf ball, one must first understand what golf swing flaw is causing the shanked shots. In this golf lesson article and subsequent video by Herman Williams, PGA Professional in Raleigh, NC, we will discover both the causes and the cure for the shank.

First, a definition. A shanked golf shot is simply a shot in which the golf ball has struck against the inside corner of the heel of the club where the clubface joins the neck or hosel. This causes the golf ball to ricochet violently offline – to the right for right-handed golfers, left for the lefties.

Occasionally if you are really lucky the ball will make perfect contact with the front of the hosel where the shaft goes into the neck and the ball will go straight, but it will be a grounder as the blunt strike just beats the ball along the ground. If you’re not so lucky you may catch the golf ball toward the back of the hosel and have the ball fly right through your legs – kind of embarrassing when other golfers are behind you.

Lastly there is the rapid double-hit. Some shanked shots will ricochet off the hosel headed dead right only to be struck again by the toe of the clubface as it flies by – these shots exhibit a weird corkscrewing ball flight that still goes right but not straight out of bounds like the traditional shanked shot. The double-hit can be verified with impact decals on the face as you will see an impact mark on the heel and the toe from the same shot. However, it happens so fast you cannot hear or feel the double hit.

Most golfers think the shank and its violent, clanky offline flight are caused by an open clubface. However that is almost NEVER the case. In fact for most golfers the face is actually closed when the ball makes contact with the neck or hosel. The ball first contacts the rounded, angled portion of the inside of the neck and starts flying offline before any true contact with the flat clubface can be made.

So we know the face is not open and the ball flies dead right due to striking the neck. But why did it hit the neck?  Well there are 3 primary causes. Two related to swing path, one related to hand and wrist action. [A 4th possibility is caused by losing balance with the body drifting toward the ball in the downswing, but we will stick to what the club is doing in this article. If your body is diving toward the ball, try to keep your weight centered over your feet – avoid extreme toe or heel weighting.]

What Causes a Shank?

Shank Cause #1
Severe in to out swing path. This is a path in which the clubhead sinks or falls behind the player on the downswing. As speed and momentum build up, the club literally flies from coming down behind the player to going outward through the impact zone. The club stretches away from the player in the hitting area and eventually reaches too far away and shanks the ball. A right handed player with this swing style will appear to swing to the right of the target, usually draws the ball naturally but pushes it often and has a high finish.

Shank cause #2
Severe out to in swing path. This swing path puts the club outside over-the-top of the swing plane during the downswing. As the downswing gets under way, the speed of the swing continues to build and centrifugal force sends the clubhead out past the golf ball well before it arrives in the hitting area. Even though the player attempts to pull the club back across the ball, it is rarely enough, and the hosel collides with the ball and shanks it. This player usually hits fades or slices along with pulls and has a finish that appears left of target and low with the arms down around the body.

Shank cause #3 is much more subtle.
The player with this 3rd category of shanks often appears to have a technically sound swing. The shank comes out of nowhere and is a mystery to everyone watching as the swing looks good to the naked eye of the casual observer. This 3rd category of shank involves casting and or incorrectly rolling/scooping with the hands and wrists prior to and thru impact.

During the downswing, ideally the wrists will be fully hinged 90 degrees or more and this hinge will be preserved well in to the downswing to or beyond waist-high. Assuming the player can get to a waist-high downswing position with full wrist cock intact, it’s what happens next that is so important.

The back of the left wrist must rotate down (supination) as the right palm also rotates down (pronation.) But this must happen without the shaft being kicked offline in an outward direction. In other words, for the right handed golfer the right palm must be looking down and driving the club shaft along the toe line. If the right wrist gets in a bind half way down and kicks outward to relieve the pressure, it will shove the clubhead out off the intended path and shank the ball.

To prevent this problem it is imperative to have a neutral to weak right hand position that will not tend to get underneath the grip & club shaft in the  downswing and eventually scoop or shove the shaft outward. The weaker right hand will allow the palm to stay on top facing down while pressing the shaft down and keeping lag pressure along the back of the shaft all the way to impact.

Once you’ve learned to create a neutral to weak right hand grip, bend it with dorsiflexion in the takeaway and backswing to “support the tray of dishes” at the top. Then bring the club down with the right palm facing down for right handers. Keep that wrist bent back all the way to the hit. No scooping allowed.

For the shanks caused by swing path, simply put a box or headcover along the outer edge of the target line about one inch outside the ball and hit shots without hitting the obstacle. You can even create a gateway to hit through by placing a spare golf ball to the outside of the ball in play and then put another ball to the inside. This looks and feels like swinging thru a goal post and really sharpens the focus and the feeling of returning the clubhead on the proper path.

Herman Williams

Check out the following video to see the causes and cures for the shank first-hand. Be sure to comment.

Flat Left Wrist at Top of Backswing – Golf Swing Lesson

In golf a flat wrist at the top of the backswing is a very important concept to master. This online golf lesson is dedicated to explaining the backswing and particularly the concept of a flat wrist. For a right-handed golfer this will be a flat left wrist at the top of the backswing.

A solid, flat left wrist in the backswing of the golf swing assists with keeping the golf club on plane, keeps the transition from getting loose, helps stop over swinging and most importantly helps the golfer hit straight golf shots with consistent, controlled trajectory. Read on for a full explanation and don’t forget to watch the video at the end and leave your comments.

Golf Backswing: Flat Wrist at the Top

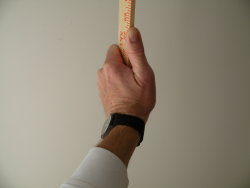
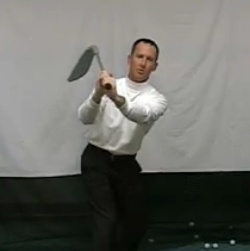
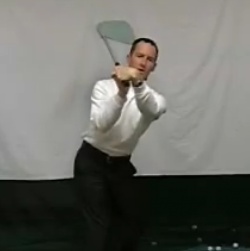
There are so many possible angles and wrist positions in a golf swing, we first need to clarify what these are and what the desired backswing position looks like. By definition the flat wrist position at the top of the backswing for a right handed player involves having the left forearm, left wrist and back of left hand all in alignment as if a ruler were strapped to the arm like a splint while the wrist is hinged or cocked approximately 90 degrees. Assuming the golfer has a neutral golf grip, the leading edge of the clubface will also be in the same plane as the back of the left hand. See “Top of Backswing” photo upper left.

The difficulty of getting into this flat wrist position in the backswing for most golfers is due to the hinging of the wrists and rotation of the forearms during the takeaway and backswing. The wrists can hinge in four directions and the forearms can rotate back and forth in two directions. In layman’s terms the wrists hinge or cock up and down and hinge back and forth while the forearms can also roll back and forth. These movements can get pretty mixed up if not trained correctly or if simply left to whatever the player deems comfortable. In fact to further complicate things, we want a flat left wrist at the top of the backswing and impact, while at the start of the golf swing the left wrist is actually slightly cupped.

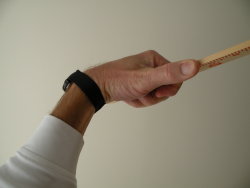
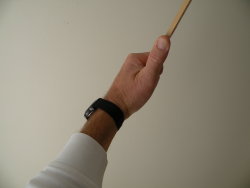
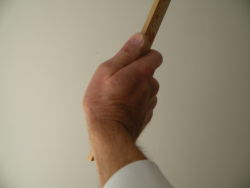
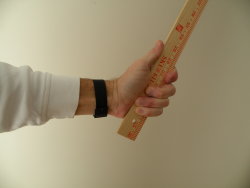
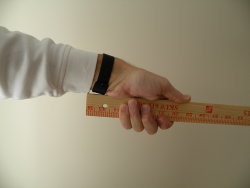
Don’t get confused yet. Let’s get the layman’s terms, medical terms, and golf terms all defined so the language doesn’t sidetrack us. I’m using a yardstick in the photos instead of a golf club since the flat sided yardstick will reveal more detail about the positions. Try it; it’s good for working on the grip also.

___________________________________________________________________________

Cupped left wrist in golf
Cupped left wrist – dorsiflexion

Cupped left wrist. Medical term is dorsiflexion with knuckles bent back toward watch face. Notice flat face of yardstick faces up “adding loft.”

Golf Backswing - Cupped Wrist at the Top
Cupped wrist at top of backswing with Open Clubface

Generally causes an open clubface at top of backswing with toe pointed down, followed by  casting and scooping at impact with high weak slices unless the player is able to manipulate the wrist back into a flat position on the downswing. Note Ben Hogan went from cupped wrist at the top to flat or bowed at impact, but it is a very difficult, advanced move for most, and he was trying not to hook.

____________________________________________________________________________

Bowed left wrist in golf
Bowed left wrist – Palmar flexion
Golf Backswing - Bowed left wrist at the top
Bowed wrist at top of backswing with Closed Clubface

Bowed left wrist. Medical term is palmar flexion with palm bent in toward inner forearm.

Generally creates a closed clubface facing the sky at top of backswing. Club tends to get laid off and too flat on downswing. Shots are usually low and/or hooked unless the player manipulates the wrist and clubface back open on the downswing, in which case blocked shots become prevalent.

_____________________________________________________________________________

Flat left wrist in golf
Flat Left Wrist

Flat left wrist with slight palmar flexion considered good for top of backswing & impact position.

Back of hand, forearm, watch face and leading edge of yardstick are all “flat” in the same plane. With a neutral grip, this would yield a perfectly “square” clubface with the leading edge of the face in alignment with the back of the hand at top of backswing and impact.

______________________________________________________________________________

Dorsiflexion of right wrist in golf
Dorsiflexion of right wrist

Bent right wrist. Medical term is dorsiflexion.

Good position at mid backswing, top of backswing and pre-impact area.

_____________________________________________________________________________

Wrist cock in golf
Wrist Cock – Radial Deviation

Left wrist cocked or hinged. The medical term is radial deviation of the wrist with the thumb being hinged toward the radius bone along top edge of forearm.
Good wrist position for mid backswing to top of backswing as full wrist hinge is desirable while keeping a flat wrist.

_____________________________________________________________________________

Wrist unclocked - ulnar deviation in golf
Wrist uncocked – Ulnar deviation

Left wrist cocked down or unhinged. Medical term is ulnar deviation of the wrist.

Position is similar to wrist position at impact.
This impact wrist position is not a conscious act. Centrifugal force and the weight of the swinging club will unhinge the wrist and bring it down into impact.

_____________________________________________________________________________

Neutral Golf Grip
Neutral Grip

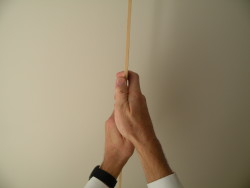
Player’s view of neutral grip in setup position centered in front of body.

Notice cupping in left wrist. Right wrist is more cupped than this on an actual golf club.

_____________________________________________________________________________

flat left wrist - bent right wrist in golf
Flat left wrist / Bent right wrist

Flat left wrist / Bent right wrist

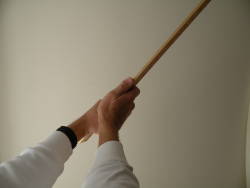
Mid backswing view just above waist high of wrists – flat left wrist starting to hinge with slight palmar flexion, bent right wrist hinging with dorsiflexion.

These wrist positions will be maintained through the top of backswing and downswing to impact.

__________________________________________________________________________

How to get the flat wrist position.
As the takeaway starts, the club and hands move back the way a quarterback hands off a football … this is the classic one-piece takeaway, nothing has happened at the wrists yet. As the hands get beyond the right thigh, the right wrist begins to bend backward or to the right known as dorsiflexion and the left wrist begins to flatten known as palmar flexion. The left wrist is virtually flat already at the half way point in the backswing.

The final motion to the top of the backswing involves a slight increase in left wrist hinge (upward wrist cock or radial deviation) while also rotating the forearms to the right. This wrist cock or radial deviation must happen without losing the previously attained flat wrist position.

This is where most golfers fail. As they add more wrist cock, or radial hinge, they tend to cup the left wrist which alters swing plane and clubface position. When done correctly, the right wrist is bent back so it feels like a tray of dishes could rest in the palm of the right hand at top of backswing. This is maximum dorsiflexion for the right wrist while keeping left wrist flat and fully cocked. Now the wrists are loaded for a powerful onplane delivery to impact with a square clubface and proper effective loft at impact.

Try this and you should see improved accuracy, a better divot  and more consistent trajectory. If you are looking for private golf lessons, click here to book a golf lesson.

Article Authored by +Herman Williams

Masters 2011 Practice Round Pt 3 – Charl Schwartzel, Lee Westwood, Angel Cabrera

Part 3 of 3 videos covers the afternoon action from the Monday Practice Round at the 2011 Masters. Herman Williams, PGA Teaching Professional, in Raleigh, NC was at Augusta National first thing Monday morning to capture the action and golf swings of the top golfers in the world as they navigated their way around Augusta National.

An added bonus this year is slow motion video with face-on views of Jhonattan Vegas and Angel Cabrera at 10 tee and great down the line (DTL) views of players at number 1 tee including long-hitting European Tour star and eventual 1st round co-leader Alvaro Quiros. Other featured players in Part 3 include Carl Petterson, Lee Westwood, Mark O’Meara, Louis Oosthuizen, Bill Haas, Edoardo and Francesco Molinari, Charl Schwartzel, Bo Van Pelt … but sorry no Tiger Woods, Phil Mickelson or Ernie Els – unfortunately they did not show up on Monday. Some additional footage shows the practice range, short game area and putting green with a great view of Robert Allenby practicing soft bunker shots to stop the ball on the speedy greens at Augusta. So click below and follow Herman Williams, PGA Teaching Professional, as he leads you through the afternoon on day one at the Masters Practice Rounds.

Masters Golf Swing Video 2011 – Pt 2

Part 2 of 3 videos from Monday’s 2011 Masters Practice Round. Herman Williams, PGA Teaching Professional, in Raleigh, NC captured great down the line (DTL) golf swing footage from top players as they teed off on number one tee at Augusta National. Also footage from putting green, practice range and short game area. Featured Pro Golfers in Part 2 include Mark O’Meara, Carl Petterson, Miguel Angel Jimenez, Jose Maria Olazabel, Lee Westwood, Henrik Stenson, Kevin Na, K.T. Kim, Ross Fisher, Anders Hansen, Edoardo & Francesco Molinari and Camilo Villegas. Thanks – Herman Williams

2011 Masters Golf Video Rickie Fowler Dustin Johnson Adam Scott & Others

Here’s your first look of a 3-Part video series at the 2011 Masters from the Monday Practice Rounds. Follow Herman Williams, PGA Teaching Professional, on a day at The Masters following players like Rickie Fowler, Dustin Johnson, Adam Scott, Bubba Watson and others. You’ll see European tour long bomber and 1st round co-leader at this year’s Masters, Alvaro Quiros, smash a tee shot from the 1st tee, see the practice range at Augusta, super clear slow motion golf swings of your favorite stars from the PGA Tour, a close look at a couple of wicked breaking putts on #2 and #6 greens, even get to watch as the greens crew sets one of the pin placements on #7 green – it’ s done with military precision and takes 4 people to get it like they want it at Augusta National. Sit back and enjoy. Thanks – Herman Williams

Note: For full screen viewing click in the bottom right corner of the video player and the video will switch to full screen mode. Also you may find individual slow motion golf swings of the Pros on my YouTube Channel – just click the link in the right sidebar.

How to Clean Golf Grips: Golf Club Repair Raleigh NC by Herman Williams, PGA

In this golf club repair video, Herman Williams, PGA Pro, describes how to clean and maintain golf club grips to delay the need for regripping your golf clubs. If your golf club grips are getting worn and slick, watch this online video tutorial to learn Herman’s tried and true techniques to bring those grips back to life without having to regrip your golf clubs.

As golf grips age they naturally get slick and often shiny. Studies have shown that the effect of slick grips can cause up to an 11% loss in club speed and distance. Cleaning the grips can counteract this problem and delay the need for regripping your golf clubs with new grips.

A traditional rubber grip or rubber and cord grip can actually be roughed up with sandpaper to remove the slick sheen that develops over time. If the grip is particularly uneven, a mill file can be used as a substitute for the sandpaper. Simply go all the way around the grip with the sandpaper or file and mill away the slick surface layer and any minor indentations in the surface.

Note that Winn grips do not tolerate the sandpaper or filing technique. The surface texture of the Winn grips does not respond to the abrasion and will actually get worse as you cut through the surface texture. Winn grips are best cleaned by gently rubbing the grip with a rag or towel soaked in rubbing alcohol. This will remove the oils, oxidation and dust that have built up on the surface of the grip.

For the rubber grips and cord grips, once the grip surface is abraded, then the grip should be washed with soap and water and thoroughly rinsed. An easy technique is to get a deep bucket or sink basin and mix a small amount of dish soap in with a couple of gallons of warm water. Make some suds and then submerge the grips into the soapy water.

Use a scrub brush to aggressively scrub the grips with the soapy water. A brass bristled brush or plastic bristled brush works great. A toothbrush is ok but a larger, heavier brush works better.

Finally, thoroughly rinse the grips with clean water and dry the grips and shafts with a towel. After a few hours of drying the grips should be ready for play. Check the tackiness and see if they have come back to life. If the grips still look shiny and feel slick then it is time for replacement with new grips.

Grip cleaning can be done monthly or quarterly depending on your playing schedule. This will definitely help maintain the “like new” feel of your grips for a longer period of time.

Regripping will ultimately be necessary when cleaning does not help. Regripping with new grips should be considered every year for active players and maybe every 2 or 3 years for infrequent players. After several years the compounds in most grips begin to break down even without any use, so don’t expect them to last through your next multi-year layoff. So get out there and play, but clean your grips along the way to keep a firm but tension free grasp on the club.

Golf Setup Lesson Pt 2 – Preshot Routine

This golf setup preshot routine golf lesson describes in detail how to move into position for a golf shot on the course and how to setup to a golf ball and aim the golf shot. Specific steps just for the setup itself are available by clicking: How to Setup for a Golf Swing.

Start by selecting your club and picking a specific target – don’t just aim at the green or the fairway – look for a tree in the distance or a spot in the fairway making the target as narrowly defined as possible. They say Ben Hogan would get so specific he wouldn’t just pick a tree; he would pick a knot on the tree to aim at.

We tend to hit where we look, so don’t look at the OB, the water, or all the glass on the side of the million-dollar home to the right of the fairway. Also the brain does not process the command “not” or “don’t” in executing a motor skill like swinging a golf club. It works by pictures – when you say to yourself, “don’t hit it into the lake,” your mind’s eye sees the lake and hits the ball in the lake.

OK, back to the preshot routine. You have already selected the golf club and a specific target. Go ahead and grip the club and take a couple of practice swings behind the ball maybe 10 feet behind the ball while standing on or near the target line. Now you are loose and it’s time to move into the ball.

You are directly behind the ball, gripping the club and holding it out in front of the chest as recommended in my setup article and video. It may help to pick an “intermediate target” like a leaf or discolored spot one or two feet in front of the ball directly along the target line.

Walk along the target line keeping the club out in front of your body as you gradually start lowering the club toward the ball. Do not walk past the ball – stay somewhat behind it relative to the target. You need to get the clubhead down early well before setting the feet in position. Go in with the clubhead first, then right foot and finally left foot. Clubface should point straight down the target line (through the intermediate target if you picked one) with the leading edge of the clubface perpendicular to the line, and the body should be oriented so it’s perpendicular to the face and the shaft. This is easy to do provided you don’t have a forward press which leans the shaft toward the target and ruins the “T-Square” alignment of shaft and body.

To really see this “T-Square” relationship at setup, try laying a 2”x4” or golf club shipping box along the target line. Now bring the leading edge of the clubface up squarely against the back of the board or box and orient the feet and body so they are perpendicular to the club shaft(the T-square), yet parallel to the board or box.

Now you are in perfect position – clubface is aimed squarely at target; butt of club is  aligned with belt buckle to ensure the body is at perfect right angles to the shaft and clubface; feet, knees, hips and shoulders are all parallel to target line as though aimed down the inner rail of a railroad track while the ball and clubface are along the outer rail. Now simply make a couple of waggles to stay loose and then fire the swing.

Lastly, if you can’t seem to take your game to the course, it’s usually because you didn’t really practice it at the range. You may have practiced your golf swing but not the golf game. So practice the setup and the preshot routine at the practice range. Get accustomed to stepping away from the practice station, selecting a club and then targeting and walking back into the golf ball. Hit one shot and repeat; you may be surprised by the results.  Don’t wait until you get to the golf course to try it.

Herman Williams Golf