golf course image

Golf Setup Lesson Pt 1- Foundation for a Golf Swing

The golf setup is the foundation for a golf swing and getting setup to make a golf swing is probably as important as creating the proper foundation on which to build a building. Get it wrong, and it won’t matter how well you build  everything else.

Look no further than the “Leaning Tower of Pisa” in Italy for a perfect example. Great architecture, it took over 175 years to build, and it’s now over 800 years old.  But because of a bad foundation, it’s just a tourist attraction now.  The Tower is tilted 10 degrees (that’s 17 feet off center at the top) and has been essentially unusable for most of its existence.  The problem all along has been the foundation.

So how do we setup to make a golf swing and avoid becoming a tourist attraction like the Leaning Tower? First, we need a great grip. But for the purposes of this article, we’re going to gloss over grip, assuming you have the details of hand position already figured out. If not, click Golf Grip – How to Grip a Golf Club.

Once the grip is established, make sure the lead arm (left arm for right-handed golfers) is sitting on top of the chest. Simply picture how the golf ball is in front of your body and the lead arm must also be in front of the body, not on the side. This is no small detail. If the lead arm is sitting on the side of the body, the chest is in the way of starting a proper takeaway and backswing. The golfer is forced to roll the arms around the body which in turn opens the clubface and sends the club off plane. Coming “over the top” on the downswing and pulling or slicing the golf ball is almost guaranteed.

Here’s how to setup correctly for a right-handed golfer. Standing at attention, grasp the club in the left hand while holding the handle beside the left hip, clubhead resting squarely on the ground near left foot. Once you have established the left hand grip, raise the left arm up on top of and across the chest (tricep lays on the pec.) Keep the left arm straight and across the chest as you slowly lower the arm until the butt of the club is straight out from your belt buckle, shaft horizontal to the ground, toe of club pointed straight up. Next, attach the right hand to the club.

You now have both hands on the club, left arm sitting somewhat uncomfortably on top of left chest, left shoulder is higher than the right (which means spine is tilted slightly to the right), right arm is soft at the elbow, right shoulder tucked back and down, club is pointed straight out from belt buckle.

At this stage, we are ready to finish assembling the golf stance. Set the feet just barely wider than the hips, toes turned out about 5 degrees on each foot, and start to bow from the hip sockets as you also let the wrists drop. The clubhead will lower to the ground directly in the center of your stance, butt of club still pointed at belt buckle. Keep your back straight as you stick your tail out and keep your chin up to avoid a “hunch back” appearance. Hands should be about a fist-width to a fist-and-a-half away from legs. Your knees should just crease slightly,  no sitting or excessive bending. You are now in the proper golf address position with an athletic posture , basically a “ready” position that would apply to any sport.

If you can’t seem to get the club comfortably down to the ground, have a professional check the length and lie angle of the clubs. A good fit should leave the clubhead resting on the ground with the toe of the club just slightly up in the air. It actually should not be soled completely flat. Do not try to sit down to get low enough if the clubs feel too short. Excess knee flex will ruin your motion. Bow forward more at the hips if necessary. Of course, if the clubs feel too long, you will probably be standing straight up with almost no bend at the hips and the toe of the club way up in the air – the clubs likely should be shortened if that’s the case.

The final step in our setup is to simply march over to the golf ball. From the setup position with the clubhead resting on the ground at the center of the stance, simply shuffle over to the ball while maintaining setup posture. Basically we create the setup while standing a few inches too far away from the ball, then slide the clubhead up behind the ball as the feet take a small step forward. We literally use the club as a yardstick to measure the body distance from the ball.

Think about the similarity to a Space Shuttle launch. NASA spends a tremendous amount of time (months) setting everything up, then they put the shuttle on the “crawler” to slowly (days) march it over to the launching pad, finally they count down (seconds) and press the button (instantaneous) to launch. We’re no different – take all the time necessary to create the setup and aim the shot; slowly, carefully march the setup over to the ball; waggle to count down and relax; then “press the button” triggering the motion – the swing  itself is over in less than a second and a half.

Next, we’ll add to the setup by talking about preshot routine. The preshot routine will help consistently apply the setup to shots with both irons and woods while aiming correctly at targets on the  range or the golf course.


Golf Lag: Stop Casting, Lag like Tiger Woods

Downswing Lag - Herman Williams Golf
Downswing lag in golf swing

In the golf swing, downswing lag  is an elusive but necessary element for solid ball striking and effortless distance. To stop casting and create lag in the golf swing like Tiger Woods, we must first understand everything about the grip, wrist and clubface action of great players like Tiger.

Essentially the pro’s are able to hold or delay the uncocking of the wrists in the golf downswing because they know they will be able to square the clubface quickly to strike crisp, straight shots. Most amateur golfers are not prepared to hold these tremendous wrist angles deep into the downswing because faulty grip or wrist positions will cause them to slice the ball. It is often more convenient to cast the club to hit a straighter shot. Casting literally throws the clubhead past the handle and causes the face to square up or rotate the toe closed more quickly during the downswing. However, the resulting power loss, trajectory problems, thin shots, lack of divot and lack of consistency are no fun either.

To begin a golf swing analysis for casting, start by looking at shot patterns. If the normal shot pattern is high and the typical iron shot is picked clean with no divot, casting is likely in such a swing. Often this player exhibits a tendency to stand up or lose his or her posture in the downswing and will also hit a higher than average number of fat and/or thin shots since the bottom of the downswing arc is behind the ball. The ball flight or shot shape can be a hook or a slice depending upon whether the player throws the clubhead in a manner that closes the toe or leaves the face scooped upward in an open position at impact. Either way, it will be obvious from these patterns that the player is throwing or casting the wrists early in the downswing which causes the clubhead to pass the hands before it gets to the ball. The shaft will be leaning backwards away from target at impact.

Now, what makes a player throw or cast the club to begin with? It usually can be traced to one of two problems. Either the clubface is open at the top of the backswing, and the player instinctively throws the clubhead early to help square it before impact, or the player simply lacks the proper coordination for driving the handle first in the downswing.

A poor transition with casting from the top of the backswing can be evidenced by a pulling motion with the left hand and a pushing motion with the right which unhinges the club rapidly on the way down before it ever gets near the ball. This pull/push action will unhinge the wrists rapidly right at the start of the downswing.

A third category of player is one who never hinges the wrists in the first place during the backswing.

So to review thus far we have an “open-faced caster”, the “pull-push caster”, and lastly the “no-hinge caster.” You might argue there is a 4th type of caster who is the “stand-up caster” but it’s hard to figure out if they stand up and throw to reach the ball or if they are standing up because they already threw the club and need to get up away from the ground. A stand-up caster will have a high leading shoulder that launches up quickly – this obviously is the left shoulder for a right-handed golfer.

How to Fix the Casting & Create Downswing Lag

A sound review of the golf grip is the first prerequisite to helping each of these casters. For a right handed golfer a somewhat strong left hand grip but weak right hand grip yeilds the maximum amount of wrist hinge in the backswing while maintaining a square clubface. (Strong left, weak right is ultimately neutral.)

Set the left thumb pad at one o’clock on top of handle, make sure heel pad is across top of handle, and once the fingers are clinched,  the “V” should point to right shoulder. The right hand palm crease of the lifeline will cover the left thumb with the right hand positioned such that the forefinger looks like a trigger finger on backside of shaft, the “V” of right hand is centered toward the chin, and the right thumb is resting left of center on the handle. The wrists are now anatomically neutral on the club with each palm facing slightly inward toward the other just like they do when the arms hang at the side of the body.

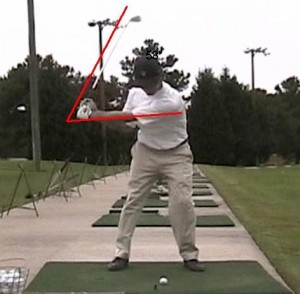
To create wrist hinge in the backswing it is as simple as feeling like pushing the butt of the club down initially as backswing starts then pushing the butt out away from chest as club gets above the waist. The left arm should be reasonably straight and firm to create the proper hinge at the wrist not the elbow. At the top of the swing the handle should be pointed away from the target to the right of a right-handed golfer. The right wrist should be bent back completely like supporting a tray of pizza. The leading edge of the clubface should be parallel to the left forearm, but this is hard to check without a mirror or video. See “Flat Wrist” article for more info on the position at top of backswing.

Now we have a neutral grip, square clubface and maximum wrist hinge at the top of backswing. What next? This is where downswing lag comes into play. We know the right wrist is bent all the way back holding that imaginary tray of pizza. Our challenge is to slam the pizza into the ground past the golf ball.

To do this the legs start by shifting both knees and ankles targetward. It is true that the head stays behind the ball, but the core of the body shifts and clears past the ball rather dramatically. This assists the hands and arms in making their initial drop to the waist high area while wrists are still fully hinged. At this stage the right wrist should still be bent back fully but the palm is now facing the ground not the sky. With the palm facing down this insures the clubface is also facing down or toward the ball and requires no scooping or manipulation to be squared up in time for the hit.

Simply continue to drive the heel of the right hand through the ball as legs and hips clear or rotate through to the finish. The wrists will not fully unhinge until after contact with the ball as the trailing right arm continues to straighten past impact.

This will yield an impact position with the shaft leaning targetward and slightly delofted compared to the casting, scooping impact position. The proper impact position of a full shot mimics the impact for a chip shot with the shaft leaning toward target. Good drills to achieve this include chipping with an obstacle like a headcover behind the ball to steepen the approach while keeping right wrist bent back; striking an impact bag with the shaft leaning forward; or swinging with a wall located to the right of the player so any casting mistakes would hit the wall. Try any or all of these and you should notice improved compression at impact.

For more help watch the video golf lesson below and “Get Hermanized” as I show you what casting is; list the symptoms such as picking the ball, scooping, thin shots & lack of distance; the “how” “why” and “what” that initially causes casting such as a weak grip and open clubface, and finally 3 specific drills to stop casting, create lag and improve compression at impact with the golf ball. You should start seeing crisp, long golf shots with piercing flight and a divot like the Tour Pros on TV such as Tiger Woods and Sergio Garcia or greats from the past like Bobby Jones and Ben Hogan. In addition to the  video below here is a link showing slow motion golf video of lag in Tour Swings of Tiger, Sergio and Ben Hogan. Enjoy.

Stop Slicing, Pushing and Blocking Golf Shots

Blocked Golf ShotThis post about slicing and blocking in golf is in response to several requests related to a previous golf lesson video on my YouTube Channel about how to stop coming over the top. It is quite common to fix one problem in the golf swing like “coming over the top” on the downswing, and then start a new problem like blocking or pushing the golf ball.

These new missed shots may be straight pushes or even push slices. Blocking and pushing the golf ball stems from the change in clubface position when dropping the club farther inside. Basically the clubface is more open relative to the ball caused by dropping the club farther to the inside on the corrected, shallower downswing plane. When the shaft drops behind the player onto a flatter plane, it leaves the clubface facing upward toward the sky half way down.

If the player is not aware of or not expecting that change, it can be frustrating to watch every shot go right after supposedly getting on the ideal swing plane. The secret is to make the necessary adjustment in wrist and clubface action to deal with the new flatter plane.

A key checkpoint is the half-way position in the downswing once the hands are about waist high. It is imperative that the right palm is beginning to face down as the back of the left hand is also facing down toward the ground. This is part of the infamous pronation and supination referred to in descriptions of Ben Hogan’s downswing and impact positions.

Picture turning your watch face down toward the ground during the downswing, assuming you are a right handed golfer wearing a watch on the left arm. Another way to see it and feel it is to turn the knuckles of the left hand downward so they face the ground and are essentially out of view at the waist-high position coming down.

This move will square up the face quickly to deliver a solid blow at impact using the newly onplane swing. Just remember, when you turn the knuckles down, the shaft cannot be allowed to kick outside or you will be  over-the-top again on an outside/in swing path that may shank or pull the ball.

Watch the golf video lesson below to Get Hermanized and learn how to stop blocking and avoid the slice and push shot in golf. Enjoy … and post your comments.

How to Practice the Golf Swing – Get the Most from Golf Lessons

Super Slow Motion Golf Training

On any given day in my role as a professional golf instructor at The Golf Academy in Raleigh, NC, I’m often asked what’s the best golf swing practice method or how to practice the golf swing. Basically people want to know how to get the most from a golf lesson and their golf swing training. Any attempt to answer these questions must take into account that there are all types of golf swings and golfers – no two alike – thus no two golf lessons are exactly alike either. Yet everybody has basically the same goal … “to get more consistent.” Oddly enough, I see plenty of consistency – the same consistent mistakes swing after swing but with inconsistent results.

Sound familiar? Well, assuming you already know what parts of the golf swing to work on and that you know what techniques are needed to fix those parts, there is a great way to apply any new learning to golf swing practice to achieve greater consistency and mastery of the correct golf swing motion. The key is super slow motion golf training.

But first, some background. It is not unusual to finish what I think is a great golf lesson only to watch in disappointment a few minutes later as my student is pulling the headcover off their driver to see how far they can hit it using their new swing with the longest, fastest club in the bag. Next, they will be dialing on their cell phone to make a tee time to go try the new lesson on the golf course.

Frankly, that’s not a very productive way to learn a brand new motor skill as complex as the golf swing. It’s really like taking the exam before bothering to study for it. Failure is inevitable. In fact most students have a hard time just executing a good practice swing correctly, much less a full speed swing with a live ball in play on the golf course with an audience watching.

Before getting caught in that trap, look at other disciplines like martial arts or boxing and how slow motion training is utilized in those sports. Martial arts practitioners are constantly training in slow motion perfecting their movements sometimes for years in preparation for the day they may need those skills in a contest or to defend themselves from an attacker. An actual fight simply speeds up all the movements that have been rehearsed in slow motion over time. Same moves, just faster execution in front of a live target, the opponent. Golf is really no different.

Former boxing champ, Sugar Ray Leonard, was one of the fastest of all time, but a little known secret of his was practicing away from the crowds utilizing super slow motion training to maintain perfect form with his punches and footwork. In the ring in front of thousands of people and a determined opponent, all he did was speed up the movement – it was already perfectly rehearsed thousands of times.

Now come back to our slow motion golf training example to practice the golf swing. Like the martial artist or boxer, we are learning a complex motor skill, trying to do it at a high rate of speed and trying to strike a specific target with precision. Can you imagine asking a new martial arts student fresh off the street to go spar full contact with a top black belt in order to learn how to fight. It would be impossible. The rookie would just be in survival mode and couldn’t possibly learn proper fighting technique while getting pummeled by the faster, better fighter. Frustration and lack of confidence would be the only accomplishment from that training method. Same thing for the golfer trying to learn a new technique at full speed in the heat of battle. It doesn’t work.

So what’s the point? Ideally as golfers we would assess the motion we want to make, preferably with professional guidance, then begin to do correct super slow motion golf training reps with no ball. Imagine taking a golf swing that lasts 30 seconds, or a minute and a half, or what about 10 minutes? There are actually golf pros out there making practice swings that take that long to complete. It’s so slow it’s like watching a sun dial. It looks more like Tai Chi with a golf club.

To practice this method at the driving range, I suggest reviewing the motion or specific changes you want to make in your mind, then executing several super slow motion golf swings. If you want to make this more realistic, go ahead and setup to a golf ball and as the club comes slowly down into the ball, just nudge the ball out of the way and continue slowly up into the followthrough. If you are not using a ball, the club should still come down slowly and brush the turf at a specific spot where the ball would normally be.  Emphasize any key trouble spots or specific moves you need to improve on. After several of these super slow motion golf swings, go ahead and take several faster versions of the golf swing without a ball.

Now you are ready for live ball hitting. Get 4 golf balls ready and execute 4 shots in a row at regular game speed. Stop after the 4 shots,  perform a couple of the super slow motion golf practice swings again with perfect form, then hit 4 more regular speed shots and so on. Repeat this pattern until you have hit at least 20 balls. (5 sets of 4 shots with both slow and fast practice swings in between sets)

It works best to start the 20-ball routine with a lofted club, and after 20 shots, change clubs or change swing thoughts. This method allows you to change clubs through the set while learning one key idea with different clubs, or you can stick with the same club but change swing thoughts after each group of 20 shots. The live shots are really a test while the true learning is taking place with the practice swings between sets.

The beauty of the super slow motion technique is it allows for perfect motion at a speed that is controllable. It can be self-diagnosed and it allows the brain enough time to begin imprinting the new pattern without the stress caused by speed and the expectation of the ball flight. These super-slow swings can be performed anywhere – at home, hotel room, office, golf course and practice range. All you need is a club and maybe a mirror and some free time. As you try new things in your swing, prove to yourself that you can make a perfect slow-motion swing before you try a fast one with a ball. You may find that slowing down actually gets you where you want to be faster.

Herman Williams, PGA
Raleigh, NC

Tiger Woods Return Masters 2010 – Golf Swing Video Pt 2

This is Tiger Woods Return at Augusta Masters Video Part 2 in a two-part series of golf videos covering the Monday Practice Rounds at Augusta in 2010. Watch as Tiger Woods and Freddie Couples tee off on the par 5 8th with a perfect down-the-line camera angle of their golf swings.

Also included at both the first tee and practice range in Part 2 is footage of Kenny Perry, Steve Stricker, Scott Verplank, John Senden, Ryo Ishikawa, Luke Donald and others. If you can’t get a ticket, this is the next best thing to being there.

To see a larger version of the video click here: HermanWilliamsGolf YouTube Channel. Simply click on the video you want then click in the bottom right of the control panel and the video will expand to full screen. Enjoy and don’t forget to post comments.

Herman Williams

Tiger Woods Return to Competitive Golf – Masters Video Part 1

Hey, I was on the first tee at Augusta National at 8 am Monday morning to film Tiger Woods return to competitive golf  Masters Video Part 1. I saw him warm-up in the short-game area and followed him and Fred Couples over to #1 for the first tee shots of their practice round together. I have a two-part video for you with Part 1 posted below. If you want to see a larger version of the video you can go to my YouTube Channel, find the video then click in the bottom right of the control panel and it will expand to full screen. Hope you enjoy.

Herman Williams

Golf Impact Position & Video Lesson – Camilo Villegas Style

The post from a few days ago about Camilo Villegas’ ball flight secret and power impact position was honestly too confusing. I’ve put together a great online golf video lesson about the Golf Impact Position Camilo Villegas style to explain things in better detail and demonstrate a couple of good drills  for you. This video gives you all the detail you need to develop the right takeaway and backswing followed by a killer impact position. If you want piercing iron shots, need to stop slicing, or just want more power and crisp contact, you need to see this video golf lesson.

The main thing Camilo does so well to get in a good golf impact position is to create a flat wrist at the top of the backswing then deliver that flat wrist to the golf ball. Actually his left wrist is slightly bowed at impact which is responsible for getting the shaft leaning forward at contact with the ball. Obviously this leads to the great divot, trajectory and piercing flight we’ve already mentioned.

So go watch the video on golf impact position, get Hermanized and enjoy. Don’t forget to post your comments and let me know what you think.

Written by

Flat Left Wrist Golf Impact Position Like Camilo Villegas

Camilo Villegas won with a flat left wrist golf impact position. Do you have it? If you hit shots too high, can’t take a divot or lack distance, then odds are you’re missing out.

If you saw Camilo’s win last weekend, you saw a classic ball striking and shot-making exhibition. He consistently hit punch shots, stingers, and partial knockdowns en route to a great victory in Florida at the Honda Classic. These shots are mandatory on a course like the Honda with tight golf holes, water lined fairways, island greens and windy conditions. Now what’s his secret you ask?

Camilo’s secret to super crisp shots is getting a flat left wrist in the backswing and keeping a flat left wrist golf impact position to “trap” the ball against the turf. It’s especially important in the wind. It actually looks and feels like smothering the ball. But this is not simply hitting down either. It’s all in the forearms and wrists.

You might be thinking, “Herman we already talked about this in your December newsletter with the YouTube Videos on neutral grip and flat left wrist.” And you’re right, but I mostly talked about your position at the very top of the backswing. We need to tell you more about how to get there and then how to deliver the club back to the ball. So let’s dig a little deeper.

First, if you aren’t sure about your grip, click on  golf grip first. A weaker grip works better than a strong grip for this technique. Johnny Miller even commented on TV about how Camilo has a slightly weak left hand grip. It allows for aggressive swinging and a powerful golf release if you can keep the back of the hand and forearm flat.

Steps to Getting a Flat Left Wrist Golf Impact Position

(assuming a right-handed golfer)
1) The takeaway starts with a straight back motion of the hands. As the arms and club move back from the ball, the back of the left hand is facing down – don’t roll the arms early. Conversely the back of the right hand moves back facing the sky. Go to about waist-high with this first move. This is known as a one piece takeaway. Note the toe of the club does not point straight up at this position. Contrary to popular belief, the clubface is actually facing down slightly and looks closed. If you are wearing a wrist watch on your left wrist, the watch face is tilted slightly facing the ground. If you can see what time it is at this stage of the backswing, you have rolled your forearms and opened the clubface too soon.

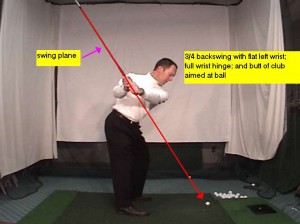
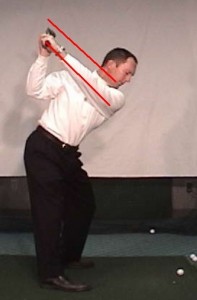
2) Once you pass this waist-high position going back, the left arm starts to rotate like twisting a screwdriver clockwise to tighten a screw with the left hand. The thumbs will start to point behind you. But make sure you wait until the club is at least waist high before you start this arm rotation – this rotation is the move that puts the shaft on plane. As the club begins planing, the butt of club points at ball or more correctly an extension of the target line on the ground behind the ball. See Photo 1: 3/4 backswing position below. Stop the armswing when the left hand is about the height of your right ear or lower if you lack flexibility. The left arm is still straight and pushed well away from the right side of your head. Now your wrist watch will be facing slightly skyward.  Left wrist is flat and hinged 90 degrees. See the second photo for a “top of backswing” position.

Golf Swing Plane - 3/4 Backswing Flat Wrist
Photo 1: 3/4 Backswing, flat wrist on plane
Golf Backswing Position - Flat Wrist On Plane
Photo 2: Top of Backswing - Flat Wrist, On Plane

3) Now for the downswing. Keep your back to the target as the arms start down close to your chest while the hips make a slight lateral shift. As the arms are falling, rotate the back of the left arm down. Remember you are trying to hit with the back of your left hand not the edge of your hand – your watchface is starting to face the ground again. Your right hand must keep up by maintaining the feeling of pressing the handle into the left palm. At impact the knuckles of the left hand should be bowed down slightly toward the ground.

The best way to start training the impact position is to hit little chip, punch shots with a wedge keeping the left hand flat the whole time. The ball should fly lower than average. These training swings should not get above your waist. Just go straight back keeping the clubface facing the ball, then strike with the back of left hand ahead of the ball at impact. Finish with left wrist flat, clubhead low below the waist and the toe of club pointed at target. This finish is key – if you look good 4 feet past impact, you know your impact position is good too.

Another good golf swing training technique is to strike an impact bag stuffed with old shirts and sweaters. The shaft should be leaning forward with the hands past the clubhead when you contact the bag. A second  impact bag training technique I like is to put the bag about 2 or 3 feet in front of the impact position down the fairway toward the target. As you swing, you should still be able to strike the bag, but since the bag is down the fairway a bit, the toe of the club should be pointing straight into the side of the bag instead of the flat edge of clubface. This teaches you to release the clubhead, extend the arms to reach the bag and keep the left wrist flat past impact. Remember, because the bag is down the fairway the clubface should have turned so the toe of the club is poking straight into the side of the impact bag.

OK – you’ve now been Hermanized with the grip, flat left wrist and golf impact position tricks Camilo Villegas used in his recent win. This article has been updated to include video on how to get a flat wrist at impact.

Herman Williams, PGA
Raleigh, NC

P.S. Post your comments below. Your questions and input will help others in our golf community and will guide me as I help you improve your game.

Herman Williams Golf